Edit your recordings
Editing your audio improves the quality of your recordings and ensures that the sounds are ready to upload to eBird and the Macaulay Library. You only need a computer, a free program, and a few minutes of practice.
1️⃣ Transfer your recordings to your computer
Audio editing is done on a computer, not on your phone.
If you recorded with your phone, you’ll need to transfer those files:
- In Merlin, recordings are automatically saved in a folder on your phone called
Merlin. - You can also send them to Google Drive, Dropbox, or email them to yourself and then download them to your computer.
If you’re using a handheld recorder, connect it via USB cable and copy the files from the SD card. Save them in a folder with a date, for example:
📁 Recordings_2025-10-30_Barranca
2️⃣ Install Ocenaudio
For editing, we recommend Ocenaudio, a free, lightweight, and very easy-to-use program.
It’s available for Windows, Mac, and Linux, and it displays your recordings both as waveforms (sound volume) and spectrograms (the visual shape of frequencies, where bird songs are visible).
💡 Why Ocenaudio: unlike more complex programs, it doesn’t require advanced technical settings and allows you to perform the basic tasks every bird sound recordist needs: trimming, normalizing, and saving properly.
3️⃣ Set up Ocenaudio (only the first time)
To work comfortably, make these initial settings:
- Set the language to English (Edit menu → Preferences → Language: Spanish)
- In the View menu, enable waveform + spectral view (the third option in the menu)
- Display time in seconds (View menu → Time format → Seconds)
- Use vertical scale in decibels (View menu → Vertical scale format → Decibels)
- Spectral scale in hertz (View menu → Spectral scale format → Hz)
- (Optional) Enable the full level meter to monitor volume
This will help you clearly visualize where the bird songs are and what parts of the recording need adjustments.
4️⃣ Trim what you don’t need
The first step in editing is to clean the recording.
Remove parts where the bird isn’t singing or where there’s a lot of noise (beginning and end), but always leave about 3 seconds of buffer before and after the main song.
This prevents the audio from starting or ending abruptly and makes it more pleasant to listen to.
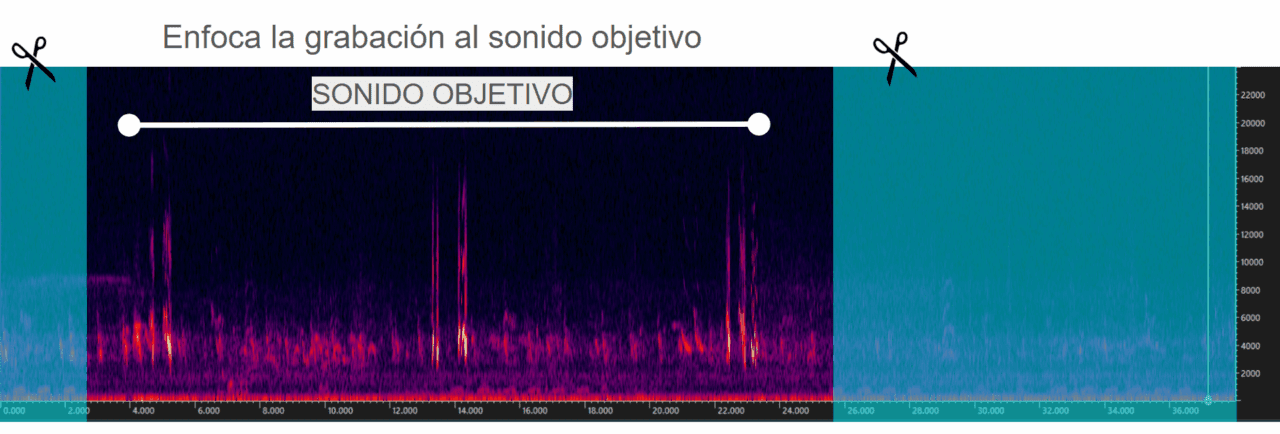
Steps:
- Select the section you want to trim at the beginning or end.
- Go to Edit → Cut, or press the “delete” key.
⚠️ Avoid cutting in the middle of the file, as it can disrupt the natural rhythm. If you need to remove something from the middle, insert 1 second of silence instead.
5️⃣ Normalize the volume
“Normalizing” means adjusting the maximum volume so all recordings play at similar loudness.
This is important because eBird and the Macaulay Library receive thousands of recordings, and having a standard volume helps listeners compare them easily.
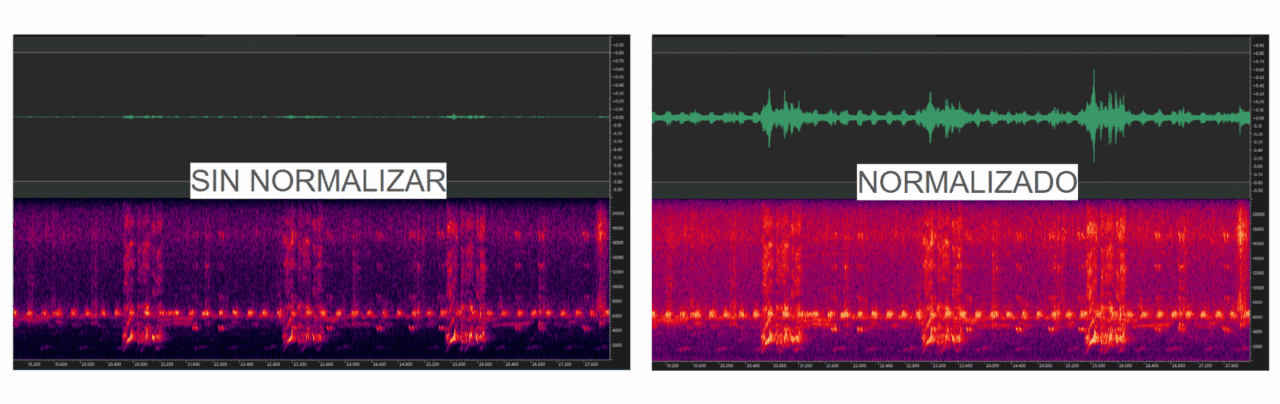
Steps:
- Select the entire recording (Ctrl + A or Cmd + A).
- Go to Effects → Amplitude → Normalize.
- In the window that appears, select:
- Normalize to –3 dB
- Unit: Decibels (dB)
💡 If your recording includes a voice announcement (e.g., “Northern Cardinal, October 30, Salta”), select only that part and normalize it to –10 dB so it doesn’t sound louder than the bird.
6️⃣ Save your final file
Don’t overwrite the original. Save your edited version as a new file:
- Go to File → Save as…
- Select the .WAV format
- Rename the file including the species, for example:
2025-10-30_Northern_Cardinal.wav
This way your recordings will stay organized by species and date, which will help when uploading to eBird.